My Mousetrap Car


 My Mousetrap Car:

My Mousetrap Car

      My mousetrap car was more designed for distance than speed. The length of the lever, the size of the wheels, and other parts of the car all are the components of a car built for distance. However, my car is still pretty fast.
      I found my design of the car online. I used the base and the wheels from on design, however I tweaked the length of the lever and the position of my mousetrap on the base.

How I Built My Car:

1. Get a CD and put hot glue around the edge
2. Push in a stopper into the hole of the CD and the glue- be careful not to cover the hole of the stopper with the glue

3. Repeat steps 1 and 2 to the remaining three CD's (the wheels of the car)


4. Cut a balloon: 2 rectangular strips

5. Pick a CD and put the strip of balloon over the edges of the CD


6. Repeat step 5 with the other strip and another CD (this will be your drive wheels)

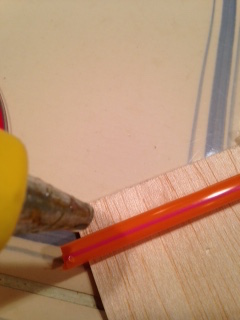
7. Get a thin bank of wood and cut a triangle from the bottom
8. I cut a Dunkin Donuts straw and placed it on the wood; cutting the part of the straw that is over the open triangle

9. Glue down the two pieces of the straw down on the plank of wood (DO NOT COVER THE CUT OUT TRIANGLE)

9. Push a round wooden pole (bottom axle), long enough for the ends to be poking out, into the straw

10. Attach the drive wheels (align the bottom axle with the hole of the stopper and press inward while rotating the wheel back and forth 45 degrees)

11. Glue down another straw at the top of the plank of wood.
12. Take an identical wooden pole (top axle) as the one in step 9 and push into the straw at the top.


13. Repeat step 10 with the other two wheels at the top

14. Take a regular victor mouse trap (without bait)

15. Pry off metal stop at the bottom and the metal bar that is attached.

16. Straighten the squared metal rod to the left side
17. Take another wooden pole (the lever) and situate it next to the straightened metal rod


18. Attach the lever and the metal rod with a big zipptie

19. To secure, tighten with two more zipties
20. Add another smaller ziptie to the top

21. Add a small ziptie to the axle at the bottom


22. Cut off the tail of the ziptie.

23. Move the silver staple over the metal rod to make the trap work.
24. Glue gun the mousetrap to the rest of the car.
FINISHED PRODUCT!

My Mousetrap Car working:


Other Mousetrap Cars I Made That Were Unsuccessful:


(There was one more with just a mousetrap, two hooks, two axles, and four CD's--- I think we threw it out)


No comments:

Post a Comment